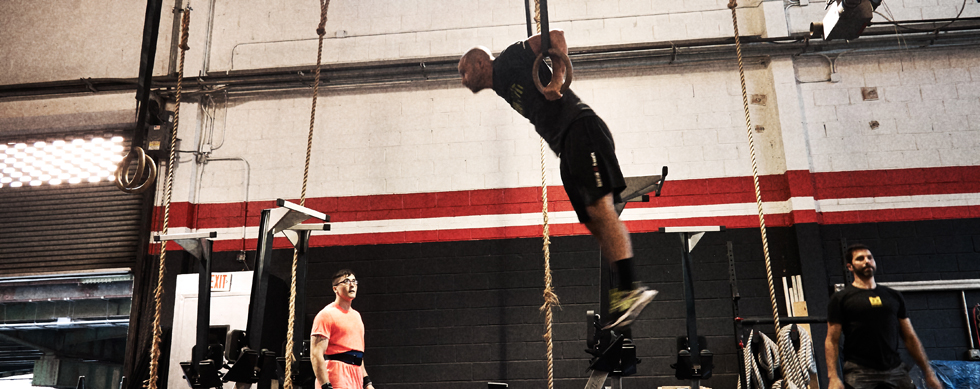
Muscle-Up, Brooklyn
By: Reuben Pearlman
CrossFit uses the term “gymnastics” not only to include the traditional competitive sport but all activities where the aim is body control. It is within this realm of activities that athletes can develop extraordinary strength (especially upper body and trunk), flexibility, coordination, balance, agility, and accuracy. Not surprisingly, the traditional gymnast has no peer in terms of development of these skills. CrossFit, therefore, aims to use short parallel bars, mats, still rings, pull-up and dip bars, and a climbing rope to implement gymnastics training.
The muscle-up is often referred to the “holy grail” of CrossFit movements. CrossFit describes the muscle-up as “moving from a hanging position below the rings to a supported position, arms extended, above the rings. It is a combination movement containing both a pull-up and a dip.” Besides looking cool as hell, the muscle-up is hugely functional. With a muscle-up you’ll be able to surmount any object on which you can get a finger hold; if you can touch it you can get up on it.
The muscle-up is an unparalleled assault to the upper body, and you have to be strong just to do one. The key to developing the muscle-up is pull-ups and dips. The muscle-up is a rare beast – an upper body exercise that requires both pulling and pushing power and phenomenal core strength to boot. “[The muscle-up] is one of the most complicated CrossFit movements you can do,” says owner/trainer of Reebok CrossFit 5th Ave. Nathan Forster. “It’s the last thing that a lot of people get.”
Here’s how to do a muscle-up on the rings:
1. Hang from a false grip – From a normal grip, roll the meat of the hand over the ring, leaving the thumb on the starting side until the wrist opposite the thumb is in full contact with the ring – this is a false grip. It shortens the forearm, greatly improving strength.
2. Pull the rings to your chest or “pull-up”
3. Roll your chest over the bottom of the rings – Stick your nose as far over the rings as possible, drive your elbows from down in front of you to up and behind you, keep the rings as close to your body as possible, tighten your gut, have the meat of the thumb trace a line from collarbone to the armpit, just above the nipple.
4. Press to support or “dip”
It’s that simple. Steps 1 and 3 are where you’ll have trouble (if you do); you’ll just have to struggle with it until you get it.
Two common barriers to the muscle-up;
1. Not being strong enough. Here’s the litmus: if you can do fifteen good pull-ups and fifteen good dips then you’re strong enough. If you can’t, work your pull-ups and dips overtime until you can do the muscle-up.
2. If you can do the pull-ups and dips, your grip is good (you’re getting bruised wrists) and you’re still unable to get above rings, then you’re either letting the rings wander away from your body or you aren’t trying hard enough. The muscle-up gets noticeably harder with every quarter inch the ring moves away from the body.
Still can’t perform the muscle-up? Brian Jaffe, co-owner of Cave CrossFit in Los Angeles, has identified four tips to help you out.
Step One: Learn the False Grip
Most coaches recommend a false grip for doing a muscle up on rings — which, counter intuitively, is the easier option. Traditionally you’d grab the ring with your fingers curling around the top and the middle of your palm cradling the side. From this neutral grip, you’d have to adjust your hands to press up, and that requires you to pull your body higher.
In a false grip your hand is further around the ring — it should be resting between the base of your thumb and your wrist. This will feel awkward at first, but the advantage of the false grip is that when you hit the top of your muscle up, your hands are already in position to dip, and less energy is required to get there.
To get comfortable with a false grip, Camille Leblanc-Bazinet, women’s winner of the 2014 CrossFit Games, recommends you bring the rings to where you can stand on the floor and practice pulling up and then pushing off the rings using this grip before moving to the next step.
Step Two: Build the Strength
The muscle up isn’t purely strength, but above-average force is required. To develop a powerful hip snap, Jaffe prescribes kettlebell swings, air squats, and box jumps. “Anything that’s going to develop explosive force and power,” he says.
To develop the back, shoulder, and arm strength you’ll need, Jaffe suggests negative pull-ups and ring dips. For the negative pull-up, start at the top of your pull-up (either on rings or on a bar) and slowly lower yourself downward. You can either jump up to get over the bar or use a box. Similarly, for the ring dips, start at the top of the motion and lower yourself downwards.
Step Three: Master the Kipping Pull-Up
A kipping pull-up uses a hip swing (kip) to help propel your chin over the bar or rings and mimics the initial motion of a muscle up. Start by hanging from the bar and swing your legs fore and aft. The movement should come from your hips, and if you can’t use your abs to stop the movement quickly, you’re relying too much on momentum.
Next, add a knee raise to your swing. When your legs swing forward, practice drawing them into your chest. Use your abs for this too.
Finally, to train the hip-snap movement, move to the floor and lay on your back with your knees and feet up. Your thighs should be vertical and your knees bent at 90 degree so your shins are horizontal. Practice snapping your hips skyward. The motion comes from your core and should drive your feet onto the floor.
Move back to the bar. Jaffe says the best way to build pull-up strength if you’re having trouble is to use a resistance band to support your weight. “Over time you can go to thinner and thinner bands,” he says. Secure a band in a loop around the bar. Put one foot through the band, then grasping the bar, thrust your hips and pull up. Also aim to pull the pull below your chin.
When a standard kipping pull-up feels comfortable, try kipping chest-to-bar pull-ups. Work up to belly-to-bar kipping pull-ups, which is the most similar to the initial muscle up movement.
Step Four: Put It All Together
To translate the kipping pull-up’s hip movement to a muscle up, lower the rings to chest height and sit with your feet on the floor. You should be holding the rings above and in front of you. Practice popping your hips up without your feet leaving the ground. As you pop your hips up, pull upwards towards the rings and crunch forward into the bottom of the dip. “This allows you to get the sequence of the muscle up while having your feet to guide you,” says Jaffe.
If you’re working with a bar, find one where you can touch the ground. Practice snapping your hips then pulling upwards. Then practice thrusting and pulling up followed by adjusting your grip so that your hands are on top of the bar, not below it. Once you feel you’ve mastered the move with your feet on the floor, it’s time to get airborne.
Raise the rings (or approach a bar) so your feet can’t touch the ground and hang with your hands in the false grip position. For extra momentum, forgo the hang and start your kip as you jump up and grab the rings. Begin with a kip forward, then as you swing back drive your knees up and thrust your hips toward the rings. Crunch forward to propel yourself over the rings and into the bottom of the dip. Push through your hands to lockout your arms. Once you’re on top of the rings, take a moment to gloat before returning to your starting position.
The muscle up will help the Athlete develop proficiency in all 10 of CrossFit’s
General Physical Skills. If you don’t remember what those are (basics was a long time ago), here they are;
1. Cardiovascular/respiratory endurance – The ability of body systems to gather, process, and deliver oxygen.
2. Stamina – The ability of body systems to process, deliver, store, and utilize energy.
3. Strength – The ability of a muscular unit, or combination of muscular units, to apply force.
4. Flexibility – the ability to maximize the range of motion at a given joint.
5. Power – The ability of a muscular unit, or combination of muscular units, to apply maximum force in minimum time.
6. Speed – The ability to minimize the time cycle of a repeated movement.
7. Coordination – The ability to com- bine several distinct movement pat- terns into a singular distinct movement.
8. Agility – The ability to minimize transition time from one movement pattern to another.
9. Balance – The ability to control the placement of the bodies center of gravity in relation to its support base.
10. Accuracy – The ability to control movement in a given direction or at a given intensity.
Also, check out this video: https://breakingmuscle.com/video/virtuosity-with-dusty-hyland-muscle-up-vol-8-the-complete-muscle-up

Leave a Reply
Want to join the discussion?Feel free to contribute!